Binary packages
Linux
Debian and derivatives (Ubuntu, Mint, Raspbian, …)
![]()
![]()
![]()
![]()
![]()
On Debian like systems, IRAF and xgterm are distributed in the standard package repositories and can be installed with the command
$ sudo apt install iraf xgterm
This also installs the NOAO package. Development tools (xc, mkpkg and development libraries) can be installed separately if needed with the package iraf-dev. PyRAF is available as python3-pyraf package, and ximtool as ximtool package.
There are also some external packages available:
- iraf-fitsutil,
- iraf-mscred,
- iraf-rvsao,
- iraf-sptable,
- iraf-st4gem (Debian 13, Ubuntu 24.04 or later),
- iraf-wcstools, and
- iraf-xdimsum (Debian 13, Ubuntu 24.04 or later),
The Debian Astro Pure Blend metapackage astro-iraf installs all available IRAF packages, so
$ sudo apt install astro-iraf
provides a simple way to install a complete IRAF system on Debian and derived distributions. The DS9 tool which many prefer over ximtool can be installed as saods9 package.
Other distributions
![]()
![]()
![]()
On Mageia Linux, IRAF can also be directly installed from the package repositories. Packages for Fedora Linux are available from the RPM Sphere third-party repository.
Please contact us if you want to help packaging for any Linux versions.
macOS
Homebrew

The preferred installation method for IRAF for macOS is via a Homebrew tap. The following commands install IRAF and X11IRAF:
$ brew tap iraf-community/tap
$ brew install iraf x11iraf
PyRAF can be installed via PyPI.
There are also some external packages available on this Homebrew tap:
- iraf-ctio,
- iraf-fitsutil,
- iraf-mscred,
- iraf-rvsao,
- iraf-sptable,
- iraf-st4gem, and
- iraf-xdimsum.
You will also need an X server (XQuartz), which can be installed via Homebrew with
$ brew install --cask xquartz
Note: After the initial installation of XQuartz, a system restart or logging out and back in is required.
As an alternative to the ximtool image display program provided with X11IRAF, most people install SAOImageDS9.
Installation package

For this installation method, please download the installer (~75 MB) for your system:
- Apple Silicon (Macs with M1/M2/M3 processor)
- Intel 64 bit (older Macs before ~2020; OS X 10.10 or newer)
- Intel 32 bit (if 32-bit IRAF is needed; Mac OS X 10.6 – 10.14)
As the software is not signed with an Apple certificate, you need to remove the quarantine attribute on the command line from the downloaded file before installing it:
$ xattr -c Downloads/iraf-*.pkg
After this, you can open the installer package by clicking on the icon.

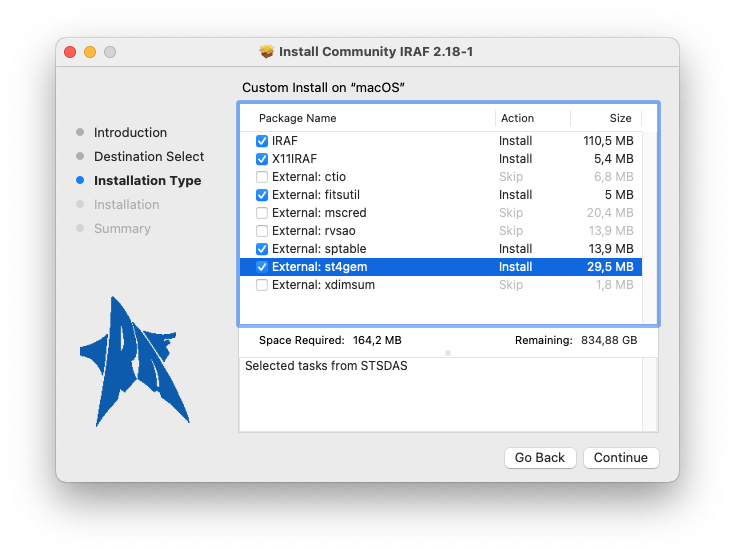
Follow now the installer instructions by clicking on Continue. In the Installation Type screen, adjust the list of packages for your needs. Aside from the main IRAF package and X11IRAF, a selection of external packages is offered. The st4gem package offers a number of tasks from the discontinued STSDAS package and can be used as an alternative.
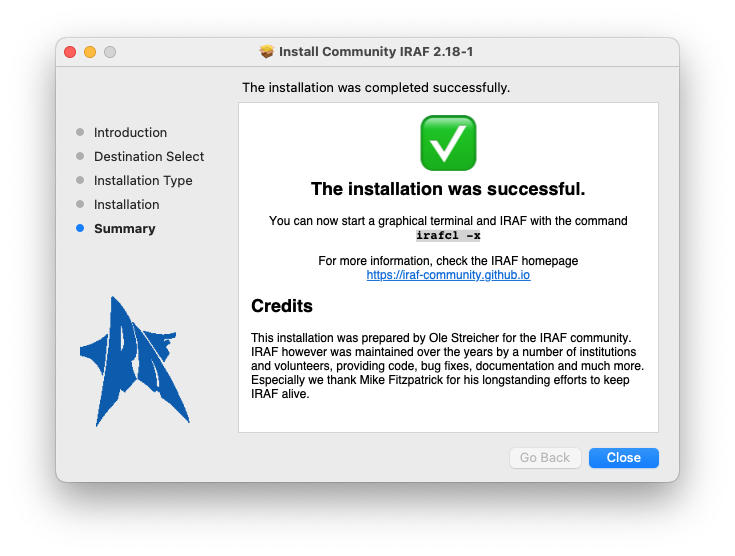
IRAF will be installed under /usr/local/lib/iraf/ and the installer
will ask you for the root password of the machine. At the end you will
see a screen like this:
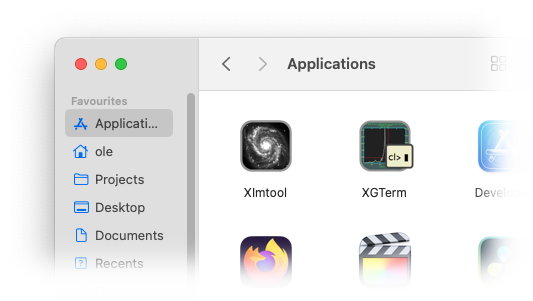
If X11IRAF was selected, two new applications, xgterm and ximtool are installed:
For these applications, you will need an X server (XQuartz). As an alternative to the ximtool image display program, most people install SAOImageDS9. For development, the XCode command line tools are needed.
Installation from source

System Requirements and Dependencies
The distributed binaries require the readline or libedit, and zlib libraries to be installed.
On Debian and its derivatives (Ubuntu, Mint, Devuan, Raspbian etc.):
$ sudo apt install gcc make flex bison zlib1g-dev libreadline-dev
On Fedora and its derivatives (Redhat, Scientific Linux etc.)
$ sudo dnf install gcc make perl flex byacc zlib-devel readline-devel
On MacOS X, you need to have the XCode tools installed. If you haven’t, you can install them with:
$ xcode-select --install
Click “Install” to download and install Xcode Command Line Tools.
Download and unpack the IRAF Distribution
IRAF v2.18.1 source code is available from Github at
https://github.com/iraf-community/iraf/archive/refs/tags/v2.18.1.tar.gz
The source distribution file is built as a tarball with the package name and version as base directory. Thus, distribution files can be unpacked with the command
$ tar zxf /<path>/v2.18.1.tar.gz
$ cd iraf-2.18.1/
Alternatively, the current development version can be cloned as a git repository from Github (assumed that you have an account):
$ git clone git@github.com:iraf-community/iraf.git
$ cd iraf/
Keep in mind that this installs the latest development version, which may contain new bugs and other obstacles.
Build from Sources
Now you can compile IRAF on your system with the command
$ make 2>&1 | tee build.log
The following IRAF architectures are supported:
| Architecture | Operating system | Supported CPU types |
|---|---|---|
linux64 |
Linux 64 bit | x86_64, arm64, mips64, ppc64, riscv64, alpha |
linux |
Linux 32 bit | i386, x32, arm, mips |
macos64 |
macOS 64 bit | arm64 |
macintel |
macOS 64 bit | x86_64 |
macosx |
macOS 32 bit | i386 |
freebsd64 |
FreeBSD 64 bit | x86_64 |
freebsd |
FreeBSD 32 bit | i386, arm |
hurd64 |
GNU HURD 64 bit | x86_64 |
hurd |
GNU HURD 32 bit | i386 |
Note that Cygwin and big endian architectures like macosx/ppc are not supported anymore.
Test the Build
IRAF comes with a small set of basic tests to ensure that the build works fine. To execute the tests, run:
$ make test
The output should look like
ecl.e: README.md
ecl.e: files.md ......
ecl.e: images.imcoords.md ...........
ecl.e: images.imfilter.md .x............
ecl.e: images.imfit.md ...
ecl.e: images.imgeom.md ........
ecl.e: images.immatch.md ..
ecl.e: lists.md .......
ecl.e: noao.astutil.md ........
ecl.e: noao.digiphot.photcal.md .
ecl.e: numerical-recipes.md ..........
ecl.e: os.md ..
ecl.e: programming.md ............
ecl.e: sys.vops.md .
ecl.e: test-syntax.md ...xs.
ecl.e: testproc.md ..........................
ecl.e: utilities.nttools.md ..............
Test summary:  128 passed
   1 skipped
   2 xfailed
Note that xfailed (x) are expected failures, which one
does not need to worry about.
For details of the tests, see the file test/README.md.
Install the software at its final place
There are two options to install the build: system wide (by default
under /usr/local/lib/iraf), or in-place for the current user
only. If you have root (sudo, admin) access, the system wide
installation is the preferred option.
System wide installation
The system wide installation copies everything that is needed to
/usr/local/lib/iraf, making it available for all users of the
computer. For this, do the following command:
$ sudo make install
This also installs the links required to run iraf or its commands to
/usr/local/bin. After the installation finishes, one can directly
start using
$ mkiraf
$ ecl
Note that the mkiraf command is now optional if a local parameter
storage is not needed. Setting the iraf environment variable is not
needed to run the system.
In-place installation
The in-place installation just configures the built system in its current location.
$ make inplace
This also installs the links required to run iraf or its commands to
~/.iraf/bin. This directory should be added to your PATH variable
so that the IRAF commands can be found by their name. Different to
previous versions, the installation does not touch your login files;
you should edit these files manually to add the path if
needed. Setting the iraf environment variable is not needed to run
the system.
Customization variables
Build customization
The build using make can be customized by a number of environment variables:
-
CC - the C compiler to use (default: cc, which is the standard C compiler of the system). gcc and clang are both known to work.
-
CFLAGS - C compiler flags (default
-g -O2). To build a 32-bit IRAF on a 64-bit system, add-m32. -
CPPFLAGS - C preprocessor flags (default: empty).
-
LDFLAGS - Linker flags (default: empty). To build a 32-bit IRAF on a 64-bit system, add
-m32. -
IRAFARCH - IRAF architecture string. This is used as suffix for the binary directory names (i.e.
bin.linux64,unix/bin.linux64,noao/bin.linux64) If not set, the IRAF architecture is determined automatically from the system. If set to an empty string'', the binary directories are just namedbin,unix/binandnoao/bin. Note that external packages need to be adjusted to also allow suffix-less bin directory names when build in this case.
Installation customization
The installation using make install recognizes the following environment variables:
-
prefix - Common installation prefix (default:
/usr/local). The installation goes to${prefix}/lib/iraf, with symlinks for the user-callable executables in${prefix}/bin, and the manpages installed in${prefix}/share/man. Theirafvariable is set to${prefix}/lib/iraf/. -
DESTDIR - directory name prepended to each installed target file. This is useful for package creators, where the files are not installed by make in their finaly installation.